|
4. Secret Research Center: Defeating the Ultimate Weapon
|
NOTE: It's seems to me that Zell is a compulsary character for this
section. Don't know the location of the Secret Research Center? View the Worldmap!
After defeating the Bahamut, head back to the Ragnarok. Press Triangle
while on the World Map and talk to your pals. Next re-enter the
Warship Island. Now you will find a Save Point outside the damaged
light system. Proceed and climb down. There you will find a Magic Stone
and you will disperse, examining the underground research facility.
Next head for the steam machine and you will have a guide of operating
the machine. Your aim is to reach the basement of the laboratory with
steam pressure with the 10x gas blocks.
Steam Layout for the
Research Center
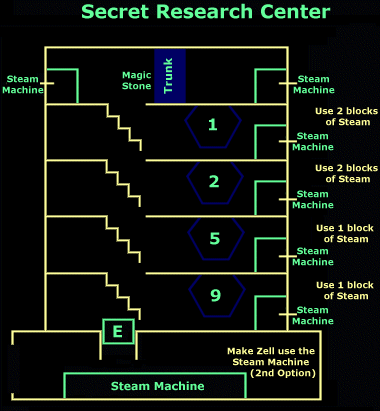
Magic Stones and Save Point locations
1. Save Point: when you exit from the huge steam machine, on the left.
2. As you reach the next area, you will find another Magic Stone
by the stairs.
3. At the winding path, you will find a Magic Stone hidden under a
blue glowing rock.
Now the door will open and enter the door. Next head down to the
basement. Note that you will encounter monsters for every 2 steps [
Encounter 50% less, ~ 4 steps , Encounter Nothing ~ 8 steps] and will
encounter very strong formidible foes such as the Iron Giants and the
monsters that you have found near the barrier that surrounds the
Esthar City... plus the Rubulmdragon that you have fought in the
previous three battles, so it is better if you have attained high
levels. Once you have reached the basement, you will find a machine,
examine the machine and pick the 1st option and you will fight the
Ultimate Weapon!


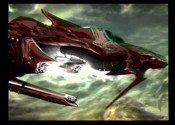
BOSS NO. 21: Ultimate Weapon
Name: Ultimate Weapon Level 60 HP: ???????? [about 500,000+]
Attacks: Sword Swipe, Shadow Flare, Earthquake, Meteor
Facts: n/a
Draw: Regen, Despell, Ultima, Eden
AP gained: 100
Strategy
He's one of the most toughest BOSS in FF8. It has very destructive
spells and high attacking power. It has very damaging spells that
could effect all members, such as Shadow Flare [3,000+ per member],
Earthquake [1,000+ per member] and Meteor [2,000+ per member.]
Note that the Ultimate Weapon has accquired the Ultima Weapon [
Cloud's FF7's Final Weapon!] How to defeat it? Here is a strategy
that I have come up with, it may not works.
Firstly, draw Regen from the BOSS. Summon G.F. Cerebrus and you will
be able to cast Regen thrice. Next cast Demi [3x] on the BOSS and it
should 9999 HP damage each time. Or if you have Aura, cast it on
member and keep on switching turns until you see an arrow on the right
and you will be able to use the character's special move! If you have
Barrier and Shield, cast it on your party as it serves quite well for
defensive purposes. Make sure that you remember to draw Eden from the
BOSS before it's death or it will be lost forever! It's possible to
defeat the BOSS at low levels, provide that you junction magic to the
character's HP.
IMPORTANT ABILITIES: Alexandar's Sosei and Leviathan's Recovery.
NEWS: It will be better if you have accquired the Mighty Guard,
stealing Behemoths outside the barriers. This was sent by
Heero Yuy. Use on Quistis and have her casting the Mighty Guard.


|
Well, you have finished the BOSS, it's time to head back to the story.
You need to head for the Witch Museum and rescue Rinoa. The Witch
Musemum is found somewhere in the south-east region, near Tear's Point
and has a Y-shape structure.
After done with all the tour, head for the Witch's Museum. Now enter
the Museum. Next head up the stairs and there is a Save Point in this
area. Talk to the Esthar Soldiers at the gate and they will allow you
to enter the musemum. Next you find Rinoa, being trapped inside a
chamber and the scientist are testing her whether is she a witch or
not. Next your members will try to stop them and thus giving Squall a
chance to stop them. Next head left and approached the captured Rinoa
you will have an FMV:
** FMV **
Rinoa is finally being released by her lover, Squall and they will
hug each other and thus leaving the Museum. [isn't this similar to FMV
in the beginning of the game, just as there is some difference in the
background.]
Now with Rinoa back in your hands, head to the entrance and you will
be allowed to leave, next your party will be asked by Rinoa to head to
Edea's house. You will find Angelo in front of the house. Next enter
Edea's house and look for Edea, after talking to both of them, exit.
Now exit and you will find Angelo and follow it, next your party
members will leave and Rinoa comes in. Meanwhile, Zell will report to
you that Esthar has been underattack and the President of Esthar
want to see you. Next exit and you find Edea talking to Squall.
Head for Esthar Captial where you will meet the President. By the way
the President of Esthar has defeated the Witch from the future 13 years
ago. Now head to the captial city. Now enter the city through the
air station and keep on walking Up and head for the main compound.
Next enter the elevator marked on the map. Now head for the mansion,
and go to the screen left twice and you find 2 Esthar Soldiers at the
gate and talk to them and you will be allowed to meet the President.
As Squall enter the room, he found Ward... and Kiros... Just walked
forward and you found out that the President is actually Laguna Loire.
Can't believe the way, that a President of a such huge city will
dressed in such a simple manner. Next talk to Laguna, pick the 1st
option and here come Professor Odain! Talk for quite a long time and
here is the scoop:
Elone has been held captive at the Pandora. Laguna wishes that Squall
could lend a hand and helped him to save Elone, to prevent Time
Compression from occuring. And must tried to prevent Altemisia from
being reborn, she is that huge thing which Rinoa has unlocked. Next
you be asked to launch an attack on the Lunatic Pandora.
 3.11 Showdown at the Lunatic Pandora
|
 Items In This Area:
|
2x Megalixirs, 2x Str Up, 1x Laser Cannon, 2x Vit Up, 1x Hero.
|
|
Magic In This Area:
|
Meteor - near the stairs found south from the main compound.
Cure - near the elevator junction.
Holy - the winding path that leads to the north.
Confuse - near Elevator No.3.
Silence - in one of the hidden doors.
|
|
Guardian Forces:
|
Gilgamesh (lost Odin).
|
|
Save Points In This Area:
|
Next to the area where you meet Biggs and Wedge.
Before you fight Mobile Type No.8 (hidden).
|
|
Monsters In This Area
Behemoth: Regen, Tornado, Flare
Iron Giant: Haste, Slow, {Stop}, {Quake}
Imp: Silence, Confuse, Break, Sleep
Tutrapod: Cure*, Esuna, Life
|
|
The Lunatic Pandora is located to the north of Tears' Point where
you get Soloman's Ring (which, incidentally, you can also gain on Disc 4). View the World Map for more information.
Once you have found the large structure, fly the Ragnarok directly into it and it will force its way
through the force-field, as complimented by a stunning FMV sequence:
Once the Ragnarok has smashed through, speak to Selphie or Quistis, and they will give you a choice of
whether to enter or leave back to the World Map to do some more preparing. If you feel you are not properly
prepared (character's levels, weapons etc), then I would recommend that you take this chance because you won't get another
until Disc 4...
When you feel you are ready to enter the Pandora, exit the Ragnarok via the cargo exit (marked with EXIT on the
map of the Ragnarok). Outside you will meet two old friends for the last time, Raijin and Fujin: prepare for a battle...
BOSS 27: Raijin Level: 43 HP: 22,200
Fujin Level: 43 HP: 17,900
|
Description:
|
Raijin: works with Fujin and Seifer. Still relies on his
strength, but can now use support magic as well.
Fujin: assisting Seifer inside Lunatic Pandora, uses support
magic as well as attack magic.
|
|
Attacks:
|
Raijin: (Pole Rush), Raijin's Special, Aura.
Fujin: Zan, Sai, Meteor, Haste, Blind, Tornado, Regen, Pain.
|
|
Facts:
|
Raijin: Weak against Poison, Absorbs Thunder.
Fujin: Weak against Poison, Absorbs Wind.
| |
Draw:
|
Raijin: Thundara, Thundaga, Protect, Shell.
Fujin: Aero, Curaga, Full-Life, Tornado.
| |
AP Gained:
|
20.
|
|
Win:
|
2x Str Up, 1x Megalixir.
|
|
Mug:
|
Raijin: 2x Str Up.
Fujin: 2x Megalixir.
|
 Strategy
 An easy fight if you attained high levels (80 and above), but from now on if you have lower levels, things could
get a bit tough.
An easy fight if you attained high levels (80 and above), but from now on if you have lower levels, things could
get a bit tough.
It's best to have Tornado and Thundaga as your two basic Elem-Def-J, as Fujin and Raijin base their attacks on them.
Have Silence, Blind and Sleep junctioned to your 3 ST-Atk-J attack combo (give Sleep to your fastest character).
If you have Doomtrain, use that and stock a lot of Full-Lifes from Fujin. If you have Eden, use it and you'll
draw this battle to an early conclusion. Remember not to use Pandemona and Quezacotl.
|
|
After defeating the pair for the last time, exit from the area and onto the next screen: head up and make
a left turn and you will meet Biggs and Wedge. As they are sick of fighting you there is no battle, so enter the
building (remember to use the Save Point). You will eventually find yourself on the path which leads to the second
elevator - head for the '02' elevator.
You will now be at a elevator junction. Draw Curaga from the Draw Point and board elevator '01'. If you have aquired
Siren's Move-Find ability, you will find a Save Point there.
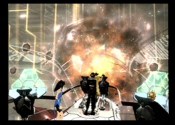
Head up and you will bump into Fujin and Raijin who will summon a mechanical beast to fight you...
BOSS 28: Mobile Type 8 Level: 41 HP: 42,300
Left Probe Level: 41 HP: 9,100
Right Probe Level: 41 HP: 9,100
|
Description:
|
Mobile Type 8: Its beam and laser attack go far beyond the
damage of any modern weapons.
Left Probe: Mobile Type 8's left shoulder. Acts on its own
as a machine has auto recovery and attack functions.
Right Probe: Mobile Type 8's right shoulder. Acts on its
own as a machine has auto recovery and attack functions.
|
|
Attacks:
|
Mobile Type 8: (Tentacle whip), Twin Homing Laser, Corona.
Left Probe: Twin Homing Laser, Corona, (Dash).
Right Probe:: Twin Homing Laser, Corona, (Dash).
|
|
Facts:
|
Mobile Type 8: Weak against Lightning.
Left Probe: N/A.
Right Probe:: N/A.
| |
Draw:
|
Mobile Type 8: Firaga, Thundaga, Blizzaga, Flare.
Left Probe: Curaga, Esuna.
Right Probe:: Curaga, Demi.
| |
AP Gained:
|
40.
|
|
Win:
|
2x Laser Cannon.
|
|
Mug:
|
Mobile Type 8: 1x Laser Cannon.
Left Probe: 2x Vit Up.
Right Probe:: 2x Vit Up.
|
Strategy
As with most battles, it is much easier with higher levels and a better setup, but it is none-the-less
possible with lower levels - even if it's a bit of a dog-fight.
This boss can attack as a whole or just with its left and right 'probes'. You need to watch out for these
messages:
Mobile Weaponary Attack Mode ON
Support Weaponary Attack Mode OFF
After this message is shown, it will fight as a whole using its 'Tentacle Whip' and sometimes its 'Twin Homing Laser' as
a counter-attack. You can still do damage to its probes.
Mobile Weaponary Attack Mode OFF
Support Weaponary Attack Mode ON
After this message has been shown, the main body doesn't attack, leaving only the probes to dish out
the damage. They will counter-attack your attacks with their 'Twin Homing Lasers'. If you linger for too long, the
boss will unleash 'Corona' which reduces everyone's HP to 1. Use Triple -> Curaga to quickly heal party members.
Overall, focus your attacks on the Mobile Type 8 (the main body), as the left and right probes have a higher defense.
Junction 100 Thundaga's to Elem-Atk-J to cause maximum damage. Also, when everyone's HP drops to 1 after 'Corona', you can riskily use your Limit Breaks.
|
|
 Quickly restore all lost HP in preparation for the final showdown of Disc 3... Enter the building that
you can see and you will find Seifer bragging about this that and the other. Ellone is being help captive by
Seifer's chums Fujin and Raijin, who finally come to their senses and tell Seifer to stop, but to no avail. They turn to
Squall to sort out Seifer...
Quickly restore all lost HP in preparation for the final showdown of Disc 3... Enter the building that
you can see and you will find Seifer bragging about this that and the other. Ellone is being help captive by
Seifer's chums Fujin and Raijin, who finally come to their senses and tell Seifer to stop, but to no avail. They turn to
Squall to sort out Seifer...
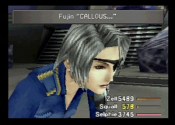
BOSS 29: Seifer Level: 45 HP: 34,500
|
Description:
|
To retain his pride as the Sorceress' Knight, he is determined
to win. His skills are even more deadly.
|
|
Attacks:
|
(Sword Swipe), Firaga, Bloodfest, (Fire Swipe).
|
|
Facts:
|
Weak against Poison.
| |
Draw:
|
Firaga, Thundaga, Blizzaga, Aura.
| |
AP Gained:
|
40.
|
|
Win:
|
x1 Hero.
|
|
Mug:
|
x1 Hero.
|
Strategy
If you took the time to gain Odin earlier in the game, this battle will have been made a hell of a lot
easier...
Without Odin
Overall, this is a pretty easy battle considering it's the last battle of Disc 3. Simply draw
Aura from him (you may as well stock up a bit while you're there for later on), and cast it on yourself: just
dish out the damage with your Limit Breaks.
With Odin
At the beginning of the battle, Odin will appear ready to attack Seifer... but Seifer attacks
Odin instead...!
|
Squall:
|
"Odin....!?"
|
| |
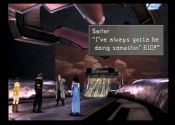
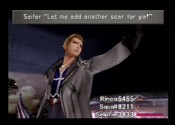
Seifer:
|
"Hah, I won't go down that easy."
"Show me what you got, Squall."
"Let me add another scar for ya!"
|
That's the end of Odin... now just kill some time by stocking up on Aura's (watch out for
Seifer's Bloodfest attack which effects all characters and can cause quite a bit of damage - cast Triple and then
Regen).
|
Gilgamesh:
|
"You gave me? the 4th one...!"
"Huh? Was it you...?"
"Then dodge my sword!"
"Eat this!!!"
|

| |
Seifer:
|
"Ergwahhhh!!!!"
|
|
Gilgamesh:
|
"Where is the dimensional interval....?"
|
|
|
 After Seifer has taken another pounding from Squall and company, Rinoa will start to edge away. Mr Almasy awakens
and grabs hold of her, dragging her towards the large chamber where the Sorceress Adel is held...
After Seifer has taken another pounding from Squall and company, Rinoa will start to edge away. Mr Almasy awakens
and grabs hold of her, dragging her towards the large chamber where the Sorceress Adel is held...

[ Previous Page | Next Page ]
|