Draw and Save Points
What’s a draw point?
Draw point is a magic source. They can be found all around the world. Only one character can draw from them at once. Draw points inside cities and other places give more magic than drawing from enemies/drawing from draw points on the world map. To get a character to draw from a draw point, just go near it and look at it. The character who gets the magic needs to have the Draw command set and enough space in his/her magic list for the new magic.
What’s a save point?
Save point is a blue and yellow slowly rolling thing that can be spotted many times in the game. If you go near it and press OK you can save your game there. Then as long as you have the save, you can always load it and start the game from that point. Not all save points are visible.
What’s the difference between world map draw points and the ones inside towns and other places?
The draw points on the world map are invisible and can’t be seen even with Move/Find ability. You can also draw very little amount of spells from them, only maximum 5 and getting that many is rare.
Move/Find?
Move/Find is a party ability learned by the GF Siren [See GF section]. When you’re equipping it, you can see all invisible save and draw points BESIDES the ones located on the world map, you can’t see those at all.
Can you draw from an invisible draw point without Move/Find?
Yes, if you know where it is. Just go to it and draw, the magic just appears out of nowhere. All draw points located on the world map you’ll need to find without any help from Move/Find.
Can you save to an invisible Save Point without Move/Find?
No, you do need the ability. Without the ability, even if you go to the exact spot where the hidden save point is, you can’t save there if you can’t see it.
Do all draw points regenerate?
Not all of them, but some do. This applies to all draw points, also ones on the world map. Some points dry off after you draw from them once, and you can’t ever draw from them again. Some refill with magic after you come back after some time, and you can keep drawing from them.
How can you see if the draw point regenerates or not?
If it turns blue after you drew from it, it means that it won’t regenerate again. If it turns white, you can draw from it later.
Why can’t I draw from a draw point though I have the command set?
| a.) | The character already has 100 of that magic. |
| b.) | You have no space in your magic list for new magics. A character can carry only 32 types of magic at once. |
I’ve heard of something like Apocalypse draw point, where is it?
Not true, there is no such thing. You can get Apocalypse only from the final battles or by cheating.
Draw Point Locations
Here’s a list of draw points inside towns and other places, what you can draw from them and if they regenerate or not.
Balamb Garden
Magic: Blizzard
Location: Training Centre, the Northern screen
Regenerate: Yes
Visible: Yes
Magic: Cure
Location: The stairs outside the school before the gate
Regenerate: Yes
Visible: Yes
Magic: Demi
Location: Cafeteria (only disk 2 when looking for Cid)
Regenerate: No
Visible: No
Magic: Esuna
Location: The library, in the screen near the first bookshelf.
Regenerate: No
Visible: Yes
Magic: Bio
Location: NORG pod in the basement level of the garden, after defeating NORG.
Regenerate: Yes
Visible: No
Balamb Garden MD Level (disk 2 conflicts)
Magic: Full-Life
Location: MD level
Regenerate: No
Visible: No
Fire Cavern
Magic: Fire
Location: Inside Fire Cavern, 2 screens before Ifrit.
Regenerate: Yes
Visible: Yes
Balamb Town
Magic: Cure
Location: The docks. Stand at the end of the dock, where the SeeD mission vessel was when going to Dollet the first time.
Regenerate: Yes
Visible: No
NOTE: After freeing Balamb under Galbadia’s army’s force (disk 2) and after defeating the Captain, you’ll sometimes receive money when drawing from this draw point.
Magic: Thunder
Location: In front of the junk shop, the second screen of the town
Regenerate: Yes
Visible: Yes
Timber Forest (First Laguna flashback)
Magic: Cure
Location: Second screen
Regenerate: Yes
Visible: Yes
Magic: Water
Location: Final screen in the forest, where Laguna gets into the truck to go back to Deling.
Regenerate: Yes
Visible: Yes
Timber
Magic: Blizzaga
Location: Timber Maniacs the editorial department, left from the first screen in a little room.
Regenerate: No
Visible: No
Magic: Cure
Location: In front of the Aurora Pub, at the entrance
Regenerate: Yes
Visible: Yes
Magic: Scan
Location: At the back alley behind the pub that leads to the TV-station, next to a drunk man.
Regenerate: Yes
Visible: Yes
Dollet
Magic: Blind
Location: Inside Communication Tower, before the lift
Regenerate: Yes
Visible: Yes
Magic: Silence
Location: Town square, near the statue and the hotel, in a bush nearby (not during invasion of Dollet)
Regenerate: Yes
Visible: Yes
Galbadia Garden
Magic: Aura
Location: By the entrance (during the Garden vs. Garden battle, end of disk 2)
Regenerate: No
Visible: No
Magic: Double
Location: Auditorium
Regenerate: Yes
Visible: No
Magic: Haste
Location: Centre of the big lobby
Regenerate: Yes
Visible: No
Magic: Life
Location: In the dressing room by the hockey pitch
Regenerate: No
Visible: Yes
Magic: Protect
Location: Hockey pitch (in the middle of the ice)
Regenerate: No
Visible: No
Magic: Shell
Location: Sports field outside
Regenerate: Yes
Visible: Yes
Deling City
Magic: Thundara
Location: Left from Caraway’s Residence, by the road
Regenerate: Yes
Visible: Yes
Deling City sewers
Magic: Bio
Location: The sewers
Regenerate: Yes
Visible: No
Magic: Esuna
Location: The sewers
Regenerate: Yes
Visible: No
Magic: Zombie
Location: The sewers
Regenerate: Yes
Visible: Yes
Tomb of the Unknown King
Magic: Cura
Location: The Western chamber
Regenerate: Yes
Visible: Yes
Magic: Float
Location: The Northern room
Regenerate: Yes
Visible: No
Magic: Protect
Location: Outside the entrance
Regenerate: Yes
Visible: Yes
D-District Prison
Magic: Aero
Location: The screen outside the prison
Regenerate: Yes
Visible: Yes
Magic: Berserk
Location: 9th Floor
Regenerate: Yes
Visible: Yes
Magic: Thundaga
Location: 11th Floor
Regenerate: No
Visible: Yes
Missile Base
Magic: Blind
Location: The room where soldiers want you to deliver a message
Regenerate: Yes
Visible: Yes
Magic: Blizzara
Location: Inspection room
Regenerate: Yes
Visible: Yes
Magic: Full-Life
Location: The room with missile launchers
Regenerate: No
Visible: No
Fisherman’s Horizon
Magic: Full-Life
Location: Down where Master Fisherman was (after he leaves)
Regenerate: No
Visible: Yes
Magic: Haste
Location: Near the train tracks
Regenerate: Yes
Visible: No
Magic: Regen
Location: By the railroad next to the save point
Regenerate: Yes
Visible: Yes
Magic: Shell
Location: Next to the junk shop
Regenerate: Yes
Visible: Yes
Magic: Ultima
Location: The mayor’s house, upstairs on the right
Regenerate: No
Visible: No
Winhill
Magic: Curaga
Location: Laguna’s room by the bed
Regenerate: No
Visible: No
Magic: Dispel
Location: Town square, down near the water
Regenerate: Yes
Visible: Yes
Magic: Drain
Location: Winhill, near the old woman’s house by the road
Regenerate: Yes
Visible: Yes
Magic: Reflect
Location: Turn right from the old woman’s house
Regenerate: No
Visible: Yes
Shumi Village
Magic: Blizzaga
Location: Outside Elder’s house
Regenerate: Yes
Visible: Yes
Magic: Firaga
Location: Work Shop, behind the Laguna statue
Regenerate: Yes
Visible: Yes
Magic: Ultima
Location: Entrance, before the lift, 3 Shumis are guarding it.
Regenerate: Yes
Visible: Yes
NOTE: It costs 5000Gil per draw.
Centra Ruins
Magic: Aero
Location: By the right ladder after the lift
Regenerate: Yes
Visible: Yes
Magic: Drain
Location: Platform before the stairs, on the right side
Regenerate: No
Visible: No
Magic: Pain
Location: Before climbing up the dome
Regenerate: No
Visible: No
Trabia Garden
Magic: Aura
Location: By the stage next to the missile, before the basketball court
Regenerate: No
Visible: No
Magic: Thundaga
Location: The front gate of the Garden
Regenerate: Yes
Visible: Yes
Magic: Zombie
Location: Garden cemetery (right side of the place)
Regenerate: No
Visible: No
Edea’s House
Magic: Curaga
Location: The bottom floor, go through the door that is in the bedroom (left)
Regenerate: Yes
Visible: Yes
Magic: Triple
Location: After Time Compression, after coming out of Edea’s home
Regenerate: No
Visible: Yes
White SeeD Ship
Magic: Holy
Location: Under the deck, on the left
Regenerate: No
Visible: Yes
Great Salt Lake
Magic: Meteor
Location: When heading to Eshtar, go up to the dinosaur’s skeleton to find it
Regenerate: No
Visible: Yes
Magic: Thundaga
Location: Once in skeleton, across the bridge
Regenerate: Yes
Visible: Yes
Eshtar
Magic: Blizzard
Location: In front of the Presidential Palace
Regenerate: Yes
Visible: Yes
Magic: Curaga
Location: Straight up from the entrance (where you first come)
Regenerate: Yes
Visible: Yes
Magic: Double
Location: Dr. Odine’s laboratory
Regenerate: Yes
Visible: Yes
Magic: Flare
Location: Dr. Odine’s laboratory, upstairs
Regenerate: No
Visible: No
Magic: Quake
Location: In front of Dr. Odine’s laboratory, next to the door
Regenerate: Yes
Visible: Yes
Magic: Tornado
Location: Shopping arcade
Regenerate: Yes
Visible: No
Tears Point
Magic: Life
Location: Near the entrance, on the left
Regenerate: Yes
Visible: Yes
Magic: Reflect
Location: Near the spot where the ring is located at
Regenerate: No
Visible: Yes
Sorceress Memorial
Magic: Stop
Location: By the entrance
Regenerate: Yes
Visible: Yes
Lunatic Pandora Research Centre
Magic: Death
Location: Outside the facility
Regenerate: Yes
Visible: Yes
Lunar Base
Magic: Meltdown
Location: After you step into the lift, but before entering the escape pod. Open up one of those chambers that seem to hold space suits on the left. There’s a draw point in one of those.
Regenerate: No
Visible: Yes
Ragnarok
Magic: Full-Life
Location: Where the other green Propagator is
Regenerate: No
Visible: No
Magic: Life
Location: Aisle, after Air Room next to the door
Regenerate: Yes
Visible: Yes
Lunatic Pandora (Laguna flashback)
Magic: Confuse
Location: Third scene, on the right
Regenerate: Yes
Visible: Yes
Magic: Cure
Location: Behind the boulder if you push it (two pigs with one stone!)
Regenerate: Yes
Visible: Yes
Magic: Sleep
Location: The second scene
Regenerate: Yes
Visible: Yes
Lunatic Pandora (in present time)
Magic: Break
Location: After defeating Seifer for the last time (end of disk 3). Climb up the structure on the right.
Regenerate: Yes
Visible: No
Magic: Confuse
Location: In the screen leading to Combat King 005
Regenerate: Yes
Visible: Yes
Magic: Curaga
Location: Middle of three lifts
Regenerate: Yes
Visible: Yes
Magic: Holy
Location: Trap door no. 1
Regenerate: Yes
Visible: No
Magic: Meteor
Location: Bottom right from where you enter the place
Regenerate: No
Visible: Yes
Magic: Silence
Location: Go to the area that has 3 hatches. Open the middle one.
Regenerate: Yes
Visible: No
Deep Sea Research Centre/Deep Sea Deposit
Magic: Dispel
Location: First floor when you go in
Regenerate: Yes
Visible: Yes
Magic: Triple
Location: Bottom floor before Ultima Weapon
Regenerate: No
Visible: No
Magic: Ultima
Location: Four screens before Ultima Weapon
Regenerate: No
Visible: Yes
Ultimecia’s Castle
Magic: Aura
Location: Wine cellar
Regenerate: No
Visible: No
Magic: Cura
Location: Path to the rightmost lift
Regenerate: Yes
Visible: Yes
Magic: Curaga
Location: Storage room, you need to use the lift to get there. There’s also a key on the floor.
Regenerate: Yes
Visible: No
Magic: Dispel
Location: Chapel (where organs and Omega are)
Regenerate: Yes
Visible: Yes
Magic: Flare
Location: After the chain, before entering the Castle
Regenerate: No
Visible: No
Magic: Full-Life
Location: Prison cell, beyond the gallery
Regenerate: No
Visible: No
Magic: Holy
Location: Treasure Room, near the coffins where you battle against Catoplepas
Regenerate: No
Visible: No
Magic: Meltdown
Location: Art Gallery, the second floor
Regenerate: No
Visible: Yes
Magic: Slow
Location: Fountain area, outside the chapel
Regenerate: Yes
Visible: Yes
Magic: Stop
Location: The clock tower
Regenerate: Yes
Visible: Yes
Magic: Triple
Location: The clock tower, jump across it by using the bell. You fight Tiamat here
Regenerate: No
Visible: No
Magic: Ultima
Location: The right door in the basement, where you fight Gargantua, on the left side of the door you entered.
Regenerate: No
Visible: No
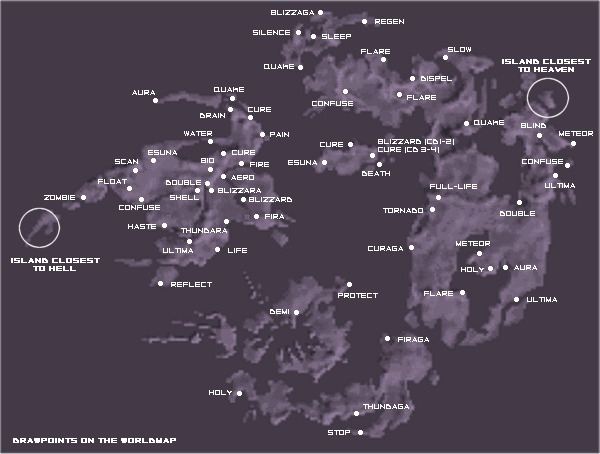
Draw Points on the World Map
It’s almost impossible to find all draw points on the world map since there are so many, but here’s a map. Remember that you can never see them and you can draw only few spells from them. Some of them regenerate but not all. Notice that most of the draw points are on the edges of continents.
Esunas can be found inside train tunnels on the world map.
Aeros can be found from railroad bridges around Galbadia.
Search the beach outside Edea’s house to find a Holy draw point.
Aura at the end of the Long Horn Island never regenerates.
The draw point above the Fire Cavern has different magic depending on the disk you’re in.
Search the corner of one wire-netting fence in Eshtar to find Full-Life.
Explore the ruins of Galbadia Garden and Missile Base for Confuse.
Islands Closest To Heaven and Hell
These two islands are special, enemies there are always at Lv100, plus they have numerous little draw points full of the best magics of the game.
[World Map]
The draw points are all around the islands, just wander around and look for them. Most of the draw points are on the edges though.
NOTE: Using Enc-None makes the drawing a lot easier.
Island Closest to Hell
Aura
Flare
Full-Life
Holy
Meteor
Triple
Ultima
Island Closest To Heaven
Aura
Flare
Full-Life
Holy
Meteor
Quake
Tornado
Triple
Ultima
Hidden Save Points
There are several hidden save points in the game. Equip Move/Find ability to some character to be able to see them and save. You cannot save your game to hidden save points even if you knew where they are.
Outside Caraway’s mansion
Tomb of the Unknown King, the room where you fight Minotaur the first time (and where he escapes).
Tomb of the Unknown King, the bridge control room
Top floor of Dollet’s pub
Timber train platform
D-District Prison the first floor
D-District Prison, the large control room
Outside the auditorium in Galbadia Garden before fighting Edea (end disk 2).
White SeeD ship on the deck
After you’ve defeated Abadon, there’s a hidden save point before entering Eshtar.
Eshtar, the gate that when you walk past you get full recovery.
Dr. Odine’s laboratory
Presidential Palace of Eshtar
Outside Adel’s room, when about to fight her.
Deep Sea Deposit, right before fighting Ultima Weapon.
Ultimecia’s Caste, bottom of the clock tower.
Found a draw/save point that is not listed here? Mistake in our information? Please inform us.
Written by alhana.
Thank you to TRZD for helping with details, telling me about the hidden draw points in Timber Forest and Deep Sea Research Centre, and also for editing the text. Thanks Colin! Couldn’t have done it without you!
Great thanks to Myth, Jaxo and Vincent for telling me the locations of hidden save points.