The Final Fantasy 8 Walkthrough


4.2 Altemesia's Castle

Next head up and you will reach the castle. Next you will find a Save Point and Squall will spilt his team into 2 parties. One of the parties will follow Squall and they will enter the place of their most horror nightmare! Now as you enter you will be forced to seal all your abilities except for attacks. Make sure that your characters has gained enough HP. Now here are some rules for this area...

1) You can only regain control of your abilities after you have defeated the BOSSES [one BOSS allows you to unlock one ability]. Here is the list of abilities which will be sealed.

    Item Command
    Magic Command
    G.F. Command
    Draw Command
    G.F's Ability (!)
    Limit Breaks
    Revive dead members
    Save

2) Within the castle, you will find Green Spots, they serve as party switching icons. Just simply step in the spot and you will be given the following options:

    1. Switch to the other party
    2. Change party members [can perform a switch when all members are there!]
    3. Ignore

MAIN PARTY

You will find the monster at the main stairway. Note that you can only use the attack command as other commands are being sealed off.

. .
BOSS NO. 27 A N D R O
Name: Andro Level: ?? HP: ~15,000+
Attacks: Fire 3, False Life, Countdown to death, Charge
Facts: ????
Draw: ????
AP gained: 31 AP

Strategy
This BOSS isn't quite tough. Just attack as your other commands are being sealed off. Here are strategy preparations before fighting the BOSS, has healed your party to full health. To increase your attacking power, junction magic to your attacks and you will do very devastating attacks on the BOSS. If the BOSS summons monsters ignore them and concentrates your attacks on the BOSS. Once defeat the BOSS, I would opted for the Magic Command, edges in combat as well as healing lost HP. Weapons Upgrading also provide you the essentials to increase your attacking power. . .

After defeat the first BOSS, head right up the stairs. Walk down the stairs and enter the door on the right. Before you enter, notice that if you head the southwest and you will find a bell, shrunk it, you will find the time on the top-left hand corner and have the other party head for the organ as soon as possible [ASAP], you will find the Omega Weapon, he is tough. [make sure you have unlock all the abilities]

Next enter the area. Walk down the stairs and you will find another Green Spot and head up to the door located in the north. You will be at the Painting Gallery. Here is a little diagram to help you:
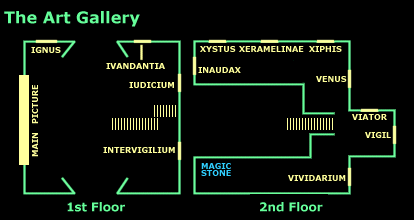
Map of the Art Gallery

Well with the map, this should be any problem. Take a look at ALL paintings. Next head for the main picture [marked + in the map] and you will given the list of pictures that you have seen before. Now pick in this order:

VIVIDARIUM -> INTERVIGILIUM -> VIATOR

And the hidden letters of the painting will be uncovered and the second BOSS will appear. Contact with it and it's BOSS fight!

. .
BOSS NO. 28 D O L M E N
Name: Dolmen Level: 46 HP: 28,809 Young Dolmen Level: 16 HP: 2,518
Attacks: Dolmen: Life Drain, Create, Cannon Blast, Whip Young Dolmen: Scuba Dive, Beam Cannon
Facts: Dolmen: Weak vs. Wind Young Dolmen: Weak vs. Wind
Draw: Dolmen: Flare Young Dolmen: Cure, Despell
AP gained: 30

Strategy
A smart and a powerful enemy, with decent armor and damage. This is what I myself will describe it as. It can create tiny troops [Young Rob and it's unlimited stock] So it's pointless to fight against them. Worst of all, if it is low on HP, it WILL drain HP from the Young Robs, thus recharging their HP. A double spell and two Tornadoes/Ultimas at time is great idea to battle against this BOSS. Just use Wind/Tornado to create harvoc, not necessary pick G.F. as it's rather useless. Draw is also not quite a wise choice as you see what spells you can find from the BOSS. Now choose either Draw [if you do not have Demi] or G.F. Pick Revive if you have enough Demi in your stock. . .

Enter the door located in the north and you will another Green Spot and you will find two stairways heading up to the other side. Now head down to the basement. [just walk up]. You will find two doors, one of them leads to the Armory Room, which can not be entered. Enter the open door at the middle. You will find a corpse holding a key, press Circle to examine it and you will fight another BOSS. [notice that there is a handle there next to the open room? you need to head back here later]

. .
BOSS NO. 29 U L F R A M I T E R
Name: Ulframiter Level: 32 HP: 30,000
Attacks: Swipe, Swipe-All, Punch
Facts: Strong against physical damage.
Draw: Demi
AP gained: 30

Strategy
Well this is prehaps the most defensive BOSS in this game. It's high defensive attributes. Use Demi /Diablo on the BOSS and it will do 9999 HP damage to this cruel monster. By the way, this BOSS has very high defensive attributes, reducing your attacking power to 1/10! So it's a wise choice that you have made. Pick Revive dead characters next as you may want to revive those dead characters. . .

SECOND PARTY

Okay, now it's time for the other team to do some business. Head for the north door of the main hall, where you will find the first BOSS. Next in the area, walk to the unstable chandelier [whole party] and you will fall directly onto the banquet room. Examine the hatch and you will be able to open it. Next walk down and you will find the 4th BOSS, a flying monster.

. .
BOSS NO. 30 T R I E D G E
Name: Triedge Level: 50 HP: 22,000
Attacks: Lightning Strike, Sense, Charge, Swipe.
Facts: Nullifies Lightning-based damage. Very Weak against Fire.
Draw: Haste, Tornado, Bio [Poison]
AP gained: 30

Strategy
This BOSS is quite tough for it has very killing moves. The Lightning Strike does about 3000+ HP damage against all allies. The BOSS absorb lightning. Use Fire-based attacks such as Fire 3 [does about 9000+ HP damage to the BOSS] or Ifrit. Extremely easy if you have Lightining- elemental defense. The BOSS will counter with Lightning Strike everytime when your character attack it. . .

NOTE: There is a magic stone located near the barrels in the north.

Now you have dealt with the BOSS, back to the top floor and head through the mid-Garden [it has fountain in the middle and has a Magic Stone in the top-left corner and a green spot in front of the fountain.] You will find an organ [which you can mess with, this is also the place where you can fight the Omega Weapon]. Here are the keys for the ORGAN.

Organ Keys
Circle Do L1 So
X Re R1 La
Square Mi L2 Ti
Triangle Fa R2 Do
Press START to Exit

Now head up the stairs on the right, there you will find the key which will fall onto the ground as soon as before you can reached it. Next head back to the Green Spot inside the banquet room [note that you will force lever down which prevents the lamp from falling and switch to the other party which should be at the basement.

MAIN PARTY

Now controlling the other party, head back to the basement and you will find a shiny item on the southeast corner of the screen, examine it and take the key [Key to the Armory]. Next enter the room and you will fought spooky monsters with no bodies [found at Avadon's Hideout] and the 5th BOSS of the section.

. .
BOSS NO. 31 G A L G A N T U R E
Name:
    Galganture [Head] Level: 62 HP: 10,626
    Galganture [Left Hand] Level: 62 HP: 6,884
    Galganture [Right Hand] Level: 62 HP: 6,884
    Galganture* Level: 50 HP: 15,000
Attacks:
    Galganture [Head]: Barrier, Haste
    Galganture [Hands]: Grab and squeeze [both], Whip, Reflect, Aero, Cure, Meteor.
    Galganture*: Counter grab, Demi, Smash, Eyes Beam, Earthquake.
Facts:
    Galganture [Head] : Weak against Holy
    Galganture [Hands] : Weak against Holy
Draw:
    Galganture [Head] : Cure, Haste, Bio
    Galganture [R/Hand]: Bio, Demi, Earthquake, Regen
    Galganture [L/Hand]: Shield, Barrier.
    Galganture* : Flare, Bio, Quake, Sense
AP gained: 42

Strategy
The first three parts are quite easy. Defeat using Holy-based attacks [Alexandar, a wise choice]. Attack them until they are defeated. Now the BOSS will appear, it's rather tough. The Eyes Beam, not only causes 1000+ HP damage and cause the Darkness and Slow status. The BOSS will counterattack your attack with the Counter grab. Use Heal to restore lost HP, now it's essential is to unlock Special Moves as the BOSS' HP are increasing more as you fight on.

* Galganture (full version) will appear after you have defeated all of them (the head and the hands). . .

[ Previous Page | Next Page ]